When you get to Aunt Eloise's House, go to the living room and put the new VHS tape into the VCR after you turn the TV on. This VHS is the one with the Red line on it. It is the blackmailing tape for Daryl Gray. Apparently Daryl is selling his father's industrial secrets to Dillon HVAC (Mitch Dillon) - ring a bell? It is worth a lot of money for Mitch to keep quiet. Mitch is selling Daryl's secrets to DETECTIVE BEECH/UNCLE STEVE????? The ring leader of some kind of military secrets? It's his journal, not Jake's journal, but UNCLE STEVE'S!!! Uh-oh. He put the journal in a safe place, he taped it underneath one of the book carts at the school. He wants cash for it.
You hear the door open.
When you get the tape and head out of the room you come face to face with Uncle Steve. He is not very pleasant when you have a little slip of the tongue. He explains that he conned you in to this little undercover charade, apparently his former partner Mitch Dillon is the one who killed Jake. He demands his journal. Now this will take a little bit of thought process on your part. You want to keep him talking but not irritate him so much that he kills you, so you want to send him to 2 places other than the tapestry to have him reveal more of his story to you. Jake was going to blackmail Detective Beech but he sent Mitch to rough him up a bit, which got out of hand. She finds out that he is just a business man, not a detective, a business man who deals in top secret information that certain governments and other parties are interested in. Also that Daryl is involved by selling off his father's trade secrets to him via Mitch. Poor kid...he had no idea how valuable his information was. She also asks him why he picked her to go undercover. He says that she fit the bill - she is a teenager, new in town and an amateur detective. He overheard her Aunt talking about her at the diner and came up with the whole undercover idea.
Finally tell him it is behind the tapestry. If you gave it a try earlier in the game you'll know that the trap does not set until the 3rd missed try, so you will have to give him a bogus code all 3 times, just be sure you do not give him the real code which was on the invitation in the credenza at the beginning of the game. which is: Sigma Phi Kappa Delta
When he get gets trapped she wishes him farewell in his transfer to a new set of bars.
Ending follows with a letter to her dad. Both Mitch Dillon and "Detective Beech" are on their way to prison. Police are still unsure about his real identity. Daryl confessed to selling the information about his father's military projects, but has been forgiven by his father. Connie returned the trophy but they refused to take it and are opening their competition to women next year. Hulk agreed to pay for the damages to the pharmacy, and Hal got his scholarships.
Answer the final trivia.
SPOILER: ALL AWARDS

Monday, September 20, 2010
LIBRARY 2ND TRIP
Go to the library and look under the chair located under the Periodic Table. Here you find the mysterious box that Jake refers to in his note: "THE ANSWER TO MY FATE LIES IN THE BOX."
Click on the box and you will see many symbols on it.

According to the matchbook clue. "A MATCHBOOK BEHIND MAXINES SCHEDULE HOLDS THE FIRST STEP". Lets look at that matchbook again. As you can see it is the symbol below:

This shows us our starting point which is the 4th row over and 4th key down.
Now we need to know which key to push. Look again at Jake's note in his chemistry book. We have already put the 18 steps in order according to the elements, now we look at his last clue. "THE LETTER AND DIGIT TELL THE DIRECTION" and back to the 4th clue: "UP, DOWN, LEFT, RIGHT THE FIRST LETTERS WILL HELP MY PLIGHT". So looking at the element order we already put together lets put the letter and digit together to tell us where to go on this symbol box.
The following is the order that we put the clues in according to the Table of Elements:
4.)He:u2 - 2
12.)C:R1 - 6
17.)Na:L3 - 11
16.)CL:D2 - 17
7.)K:R1 - 19
9.)Zn:D1 - 30
11.)AS:U4 - 33
6.)Kr:L2 - 36
14.)Y:D3 - 39
13.)Zr:R4 - 40
15.)Ag:D1 - 47
2.)Te:L3 - 52
18.)I:U2 - 53
1.)Xe:R3 - 54
10.)La:U2 - 57
8.)HF:L1 - 72
5.)Ir:D2 - 77
3.)Hg:L3 - 80
Now take the Letter and digit behind the elemental symbol and this will be the steps we will take to unlock the box.
1.) Start 4th row over 4th symbol down
2.) U2 - UP 2
3.) R1 - RIGHT 1
4.) L3 - LEFT 3
5.) D2 - DOWN 2
6.) R1 - RIGHT 1
7.) D1 - DOWN 1
8.) U4 - UP 4
9.) L2 - LEFT 2
10.) D3 - DOWN 3
11.) R4 - RIGHT 4
12.) D1 - DOWN 1
13.) L3 - LEFT 3
14.) U2 - UP 2
15.) R3 - RIGHT 3
16.) U2 - UP 2
17.) L1 - LEFT 1
18.) D2 - DOWN 2
19.) L3 - LEFT 3
See below for picture solution:

Once the combination is put in, it will unlock and you will see yet another video tape. I guess we need to go and look at this one now.
Lets go to: ELOISE'S HOUSE 3RD TRIP
SCHOOL 5TH TRIP
Let's Start with Hulk Sanchez in the gym. Nancy confronts Jake about the drugstore theft. He comes clean, you ask him why he stole the steroids, he explains that even though he got hurt he had to keep playing to impress the scouts, which didn't help and he was still in pain, then had to spend all his time doing errands for Jake. She asks about the errands he had to do and he says that the last thing Jake had him do was deliver a sealed envelope to Daryl. She then asks if he killed Jake, he says he didn't do it. We will have to go talk to Daryl about this envelope.
Next lets go talk to Connie in the Student Lounge. Nancy confronts Connie about the evidence that makes her the winner of the judo competition and that Jake was blackmailing her. She also owns up to it and is proud of what she did. Nancy asks her if she killed Jake to stop him from blackmailing her. She denies it. Nancy states that whoever pushed Jake down the stairs also beat him up, someone with a black belt could have done it. Life would have been so easy with him out of the way. She reasons with Nancy and says that she despised Jake but she would never think of killing him.
We have already talked to Hal about the blackmailing so lets now go to Daryl and see what he says about that envelope, we also need to talk to Detective Beech/Uncle Steve about the Boiler room problem. So lets go there next.
Go to: MAXINE'S 5TH TRIP
AUNT ELOISE'S HOUSE 2ND TRIP
Lets go look at that video tape. Go into the living room and go to the cabinet with the TV and VCR in it. Go into your inventory and click the videotape put it into the VCR after you turn the TV on.
Here you see Hulk Sanchez with the box of Hectinol from the Drug Station. He's the one who stole it! We are going to have to talk to him about that.
Next we see Connie in a judo suit and mask who obviously has won a trophy. So, she is the "Masked MAN" who won the Men's Judo competition. We are going to have to talk to her about that.
Finally we see Hal Tanaka plagiarizing the information in that English Essays book. We are going to have to talk to him about that.
Eject the video tape. It seems that Jake has blackmailed each of these students. We now need to go and check out these suspects with our new found information.
Let's go back to: SCHOOL 5TH TRIP
MAXINE'S 5TH TRIP
Go in and talk to Daryl. He brings up the mysterious note leaving guy and proceeds to hit on you again.
SPOILER: ALL AWARDS
You bring up that Hulk Sanchez said he saw Daryl delivering and envelope to Jake. He says it was about a school project, he gets a bit upset, and decides to leave. Wow, that was sudden.
Okay so now lets go talk to Detective Beech/Uncle Steve. Tell him about the incident in the boiler room if you want. Talk to him about Daryl's comment about him losing something last week. He tells you it was his wallet, but he found it. Then talk to him about the video tape. He thinks Daryl Gray was involved, but really wants you to find Jake's journal. You also bring up the notepad in the library of Jake's that you found. "The answer to my fate lies in a box". (We still have to find that box) He tells you to follow that lead. We need whatever is in that box.
The only thing we haven't checked yet is under his seat so lets go to the library next and look under his seat under the periodic table.
Go to: LIBRARY 2ND TRIP
SCHOOL 4TH TRIP
First lets go down to bottom floor of the maintenance room.
HINT: SAVE HERE BEFORE YOU GO DOWN THE ELEVATOR
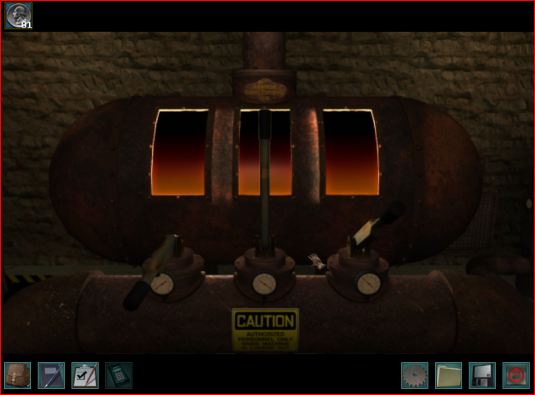
When you get down to the boiler room, you see that the boiler controls have been messed with and you must hurry to reset them according to the instructions on the wall.

When you approach the controls, you will see that it is padlocked. You can open the lock one of 2 ways:
1.) Use the bolt cutters you retrieved from the broken pipe in the kitchen or
2.) Enter the 4 digit code that is on the wall "1967"
Once the lock is removed you will need to put on the gloves that you retrieved out of the toolbox so you can move the levers without being burned.
The lever solution is as follows:
The first lever is the one on the left
The 2nd lever is the one in the middle
The 3rd lever is the one on the right.
In order to move the 2nd lever the 1st lever must be moved into the 2nd position,
In order for the 3rd lever to move both the 1st and 2nd lever must be in the 3rd position.
According to the picture below the end solution must be where the 1st lever is in the 4th position, the 2nd lever is in the 1st position and the 3rd lever is in 2nd position.
The following is the patter to unlock the solution, click on the following levers to solve:
LEFT, MIDDLE, MIDDLE, LEFT, RIGHT, RIGHT, LEFT, LEFT, LEFT, MIDDLE, MIDDLE, LEFT, LEFT

Now that the boiler has been fixed, look around the room, if you look at the back corner by the fuse boxes you will see a couple crates and a barrel, and on them are a coffee cup from Maxine's as well as a MATCHBOOK! Hey we've been looking for that! Click on the matchbook and it opens to see a symbol, this reminds you of the clue from Jake's note in his chemistry book: "A MATCHBOOK BEHIND MAXINE'S SCHEDULE HOLDS THE FIRST STEP". That symbol looks kinda like the symbols that were written in Jake's Chemistry book. Hey that is "HIS SEAT" remember the clue from the computer catalog that says: "EVIDENCE J. ROGERS UNDER MY SEAT REFERENCE". click it again and it will go into your inventory.
Continue to look around the room and you will see that the elevator button has been tampered with and cannot be fixed so we have to find a way out. If you continue to look around the room you will see a grate in the back corner on the wall behind the boiler. Go over to the grate and you will see a video tape laying up against the wall, this must be the VIDEO TAPE you have been looking for. Click on the grate and remove it, then go through the hole and you will come out to the map.
Go to: AUNT ELOISE'S HOUSE 2ND TRIP
HINT: SAVE HERE BEFORE YOU GO DOWN THE ELEVATOR
When you get down to the boiler room, you see that the boiler controls have been messed with and you must hurry to reset them according to the instructions on the wall.

When you approach the controls, you will see that it is padlocked. You can open the lock one of 2 ways:
1.) Use the bolt cutters you retrieved from the broken pipe in the kitchen or
2.) Enter the 4 digit code that is on the wall "1967"
Once the lock is removed you will need to put on the gloves that you retrieved out of the toolbox so you can move the levers without being burned.
The lever solution is as follows:
The first lever is the one on the left
The 2nd lever is the one in the middle
The 3rd lever is the one on the right.
In order to move the 2nd lever the 1st lever must be moved into the 2nd position,
In order for the 3rd lever to move both the 1st and 2nd lever must be in the 3rd position.
According to the picture below the end solution must be where the 1st lever is in the 4th position, the 2nd lever is in the 1st position and the 3rd lever is in 2nd position.
The following is the patter to unlock the solution, click on the following levers to solve:
LEFT, MIDDLE, MIDDLE, LEFT, RIGHT, RIGHT, LEFT, LEFT, LEFT, MIDDLE, MIDDLE, LEFT, LEFT
Now that the boiler has been fixed, look around the room, if you look at the back corner by the fuse boxes you will see a couple crates and a barrel, and on them are a coffee cup from Maxine's as well as a MATCHBOOK! Hey we've been looking for that! Click on the matchbook and it opens to see a symbol, this reminds you of the clue from Jake's note in his chemistry book: "A MATCHBOOK BEHIND MAXINE'S SCHEDULE HOLDS THE FIRST STEP". That symbol looks kinda like the symbols that were written in Jake's Chemistry book. Hey that is "HIS SEAT" remember the clue from the computer catalog that says: "EVIDENCE J. ROGERS UNDER MY SEAT REFERENCE". click it again and it will go into your inventory.
Continue to look around the room and you will see that the elevator button has been tampered with and cannot be fixed so we have to find a way out. If you continue to look around the room you will see a grate in the back corner on the wall behind the boiler. Go over to the grate and you will see a video tape laying up against the wall, this must be the VIDEO TAPE you have been looking for. Click on the grate and remove it, then go through the hole and you will come out to the map.
Go to: AUNT ELOISE'S HOUSE 2ND TRIP
MAXINE'S 4TH TRIP
Go to Maxine's again and talk to Daryl.
SPOILER: ALL AWARDS
You ask him what's been going on and he says that your uncle is not there, and proceeds to tell you that he is kind of a Mr. Crankypants. He has been on edge and last week seriously freaked out on him by losing something in the diner and accused Daryl of stealing it. Apparently he went kinda psycho. When you try to leave Daryl says that someone left a note for you, you read it and it says:
"I have the solution to your mystery. Meet me in the basement of the maintenance room at the high school."
I guess that is where we go next.
Lets go to: SCHOOL 4TH TRIP
Saturday, September 18, 2010
LIBRARY
Once you enter the school, go to the library (follow the wall signs to the library). Once you are at the double doors, use the small silver "ideas" key on the doors and they will open.
SPOILER: ALL AWARDS
Go to the right, go to the right again and you will see a magazine rack. Click on the "SPORTS TODAY" magazine and open it up. Nancy says: "Hectinol is a steroid and was one of the drugs stolen at the Drug Station" I wonder who would take steroids???An athlete maybe??? Hulk Sanchez maybe??? We should probably look for more evidence on this.
Now turn around and you will see some more book shelves You will see 5 active bookshelves. Click the top left bookshelves click on the K11 book , Nancy says: "Hmmm...that medallion Connie is wearing is Kanji for crane." This reminds us of the clue#7 "NOWHERE TO TURN TO, NOWHERE TO HIDE, LET THE BOOKS IN THE LIBRARY, BE YOUR ANSWER GUIDE." "A SYMBOL OF KANJI WORN WITH GREAT PRIDE REFLECTS BIG SECRETS THAT SOMEONE MUST HIDE " "HE DID WHAT IT TOOK TO MAKE THE GRADE, EVEN IF IT WASNT CHEATING, TO KEEP UP HIS CHARADE."
Click next on the upper right bookshelf with the multi-colored books, click on the "B" volume of the Global Book Encyclopedia collection. Open it up and see that is on Braille. How very helpful. If you remember, you needed to decipher the door lock for the maintenance room. The password on Aunt Eloise's computer log in for the maintenance room was "NOTE". See on this page that the braille code should be

Now pan over to the short wooden file cabinet. You will see that each cabinet is a map drawer, which reminds us of clue #10 "FIFTH MAP DRAWER"
Click on the 5th Drawer and you will see a card as follows:

This must be deciphered. To solve this clue, begin from the top right red letter "I" and skip every other letter going from left to right top to bottom and when you get to the bottom start on the blue letters in the same manner in the same pattern. See below for answer:
"IF ANYTHING HAPPENS TO ME SEARCH UNDER MY COMBO IN CATALOG!"
Do you remember his combo? Lets go look for the catalog.
Notice that there is a 17th code: Na:L3
Head over to the reference section in the back right hand corner and go to one of the computers on the wall. Click on the computer and enter Jake's combination into the search bar of the computer: 5253 and click "GO"
The answer comes up "EVIDENCE J. ROGERS UNDER MY SEAT REFERENCE"...Well I guess we look under his seat, but where is it? Lets continue to look around.
Let's head upstairs. Go to the right. and around the banister railing to the back wall by the portraits. Here you see a Periodic Table of the Elements on the wall approach and click on it. It shows a close up of the Periodic Table. This reminds us of the clue #9 "PUT ELEMENTS IN ORDER TO OPEN PUZZLE" This still does not mean anything yet so lets continue on.
You will see a table with a book under it under this Periodic Table of Elements. Click on the table and it goes to a close up, there is a note "Jake was here!" as well as a chemistry book. This is the chemistry book of Jake's from the clue found on the eye chart "IF ANYTHING HAPPENS TO ME LOOK IN MY CHEMISTRY BOOK PAGE THREE ZERO FIVE."
Click on the book and it automatically opens to page 305 and you will see a note from Jake as follows:

Notice that there is an 18th code: I:U2
We do not know about the box yet, and we haven't seen the matchbook yet, if you remember, that schedule corner at Maxine's diner was ripped off and nothing was there, so we will need to keep an eye open for the box and the matchbook. He does mention 18 steps and so far with the code on the bottom of this page makes 18 codes that we have found. "The elements tell the order", we will need to put together this clue. This reminds us again of the clue#9 "PUT ELEMENTS IN ORDER TO OPEN PUZZLE". Finally "The letter and the digit tell the direction" This shows that the first part of the code goes to the table of elements and the 2nd part of the code tell the direction, but the direction of what? We will have to see. For now lets put the elements in order. I will list the first code to the 18th in the order that we found them on this walkthrough for the sake of organization then we will look at the periodic table of elements and can put them together from there.
1.)Xe:R3
2.)Te:L3
3.)Hg:L3
4.)He:u2
5.)Ir:D2
6.)Kr:L2
7.)K:R1
8.)HF:L1
9.)Zn:D1
10.)La:U2
11.)AS:U4
12.)C:R1
13.)Zr:R4
14.)Y:D3
15.)Ag:D1
16.)CL:D2
17.)Na:L3
18.)I:U2
Now correspond the first letters with the appropriate symbol on the Periodic Table. You will see that each symbol has a number beside it. It is this number that will determine the correct order of the elements. I will put the number from the table of elements by the correct element symbol. See Below:
1.)Xe - 54
2.)Te - 52
3.)Hg - 80
4.)He - 2
5.)Ir - 77
6.)Kr - 36
7.)K - 19
8.)HF - 72
9.)Zn - 30
10.)La - 57
11.)AS - 33
12.)C - 6
13.)Zr - 40
14.)Y - 39
15.)Ag - 47
16.)CL - 17
17.)Na - 11
18.)I - 53
Now all we have to do is put them in order smallest to greatest according to the number on the Periodic Table of Elements:
4.)He:u2 - 2
12.)C:R1 - 6
17.)Na:L3 - 11
16.)CL:D2 - 17
7.)K:R1 - 19
9.)Zn:D1 - 30
11.)AS:U4 - 33
6.)Kr:L2 - 36
14.)Y:D3 - 39
13.)Zr:R4 - 40
15.)Ag:D1 - 47
2.)Te:L3 - 52
18.)I:U2 - 53
1.)Xe:R3 - 54
10.)La:U2 - 57
8.)HF:L1 - 72
5.)Ir:D2 - 77
3.)Hg:L3 - 80
Now we have them all in order: The last clue on his notebook page says that the letter and the number tell you the direction. Hmmmm, maybe this goes with the fourth clue we came to: Clue #4 "UP, DOWN, LEFT, RIGHT THE FIRST LETTERS WILL HELP MY PLIGHT". If you notice, the first letters are all either U, D, L or R. So this goes with this clue. Now we need to find out where we use the combination. Lets move on.
So we have found a lot of info here, lets go see if we can enter the Mechanical room now that we have the code.
Go to the Mechanical room and enter NOTE in braille as follows:


(Did you notice that the center section spells Jake??? Interesting)
Enter the door and go to the elevator, click on the red button to go down to the boiler room. Here you are taken down to the boiler room, look around and you will see a sign on the wall "1967". You will also see a tool box on the floor, open it up and retrieve the pair of gloves in it. Also notice the emergency instructions on the wall above the toolbox. Well that is all for this room. Click on the elevator button to go back upstairs.
It looks like we need to discuss some of the things we have found out in the library with all the students so lets go question Connie & Daryl.
Start with Connie in the Student's Lounge about that symbol she is wearing: She is very coy when you bring out that her necklace means "Crane" and that is the name of the judo school.
Lets go now to Daryl at: MAXINE'S 4TH TRIP.
MAXINE'S 3RD TRIP
Enter Maxine's and talk to Daryl about the meeting that he had with Jake, he evades the conversation about talking to him about work. Ask him about the empty video casette, he wants to know how you got in the locker, evade the answer one way or another, and then discuss him soaping up the windows on the teacher's lounge, he spent 2 days in detention but Nancy puts together that he got caught the night of Jake's murder. Then talk to him about his dad owning Gray Enterprises, this is a soar subject for him.
Next lets go talk to Detective Beech/Uncle Steve, he makes a comment to you about how you answered Daryl about the locker, then you report to him the threatening call from Mitch Dillon. He explains that he is a suspect, but he is not too concerned about him, you ask about how Mitch is involved, but apparently that is none of your business...hmmm interesting...She asks about the missing video tape, he doesn't know where it is but encourages you to find it.
Let's now go back to the school and talk to Connie.
On to: LIBRARY
ALL AWARDS

1.) NED DEFENDER
Rebuffing each amorous attempt by Daryl
Pretty plain and simple, just make sure whenever he flirts with you make sure your answer is as direct as you can be. YOU MUST TURN HIM DOWN 3 TIMES TO GET THIS AWARD. There is a way to screw this up so be sure to question him often and after each lead.
2.) EASTER EGG - Confidential
Enter the #14 puzzle code into the pop machine and see what happens "COOL, COOL, POP, SPOT, GRAPE"
When you enter this combination - Cool, Cool, Extra POP, SPOT Cola, Grape; an Easter egg comes out and you will also be awarded 80 quarters.
3.) TRIVIA TAMER
answering the trivia question correctly


4.) POP PRANKSTER
Grape, Grape, Orange, COOL!!
You get this by setting off the alarm at least 5 times
5.) BARNACLED!
For reaching last level of Barnacle Blast
HINT: This has 20 levels and is a very difficult game if you try to beat it straight through. But to win it faster and easier, save it mid game so you don't lose all your lives. If you save mid game (meaning during a live ball), you can reload without saving from where you left off and it starts your paddle with a new ball (rather than still in mid air). Quite the cheat. I played this game all the way through this way and ended up at the end with 45 lives. It is a bit of a bummer that it doesn't make a big deal when you finish level 20, it just starts over at level 1 keeping your high score. (Mine was 2,344,000 at the end of all 20 levels.)
It was kinda neat that when you reach level 20 it says "JAKE WAS HERE"

6.) LIBRARY LOVER
For reading every single book
In Aunt Eloise's House, go in to the living room and go to the stack of books on the small table, open and read the book "Hidden Clues are Everywhere" you can read the portion about the haunted ghost bridge - but the clue is in the Title, it gives you an idea what to look for to get started - hidden clues.
Also in Aunt Eloise's House on the book shelf to the left of the TV/VCR is a set of books, click on the active book and open it to see some sort of dialogue.
Enter the library in the school. There is a lot to look at there so for the sake of organization we will pan the room from left to right and bottom to top floor respectively.
Enter the doors and look left, starting at the double doors where the book return cart is, move toward the book shelves on the left side of the room. Turn the corner move up one screen and take a left into the isle.
Here you will find an active shelf on the left on the first column 2nd shelf from the top. Click the active shelf and you will see an active book on that shelf on "How to Identify Gemstones", thumb through it until the end.
In the same isle you will find an active shelf on the right, on the 2nd column, top shelf. Click the active shelf and you will see an active book on that shelf on "Ichi-Do", thumb through it until the end.
Now lets go to the next isle. Here you will find an active shelf on the left on the 2nd column, 3rd shelf from the top. Click the active shelf and you will see an active book on that shelf on "What is a Relic", thumb through it until the end.
In the same isle you will find an active shelf on the right on the 2nd column 2nd shelf from the top. Click the active shelf and you will see an active book on that shelf on "Werewolves", thumb through it until the end.
Now let's go over to the other side, so starting from the library double doors, turn right, go forward twice and look left at the book shelves. You will see 5 active bookshelves, click the top left bookshelves with the red books, click on the "K11" book of the Encyclopedia Americana collection, (hmmm that medallion Connie is wearing is Kanji for crane.)
Click next on the lower left bookshelf with the purple books, click on the "H" volume of the Knowledge collection. Open it up and see that is about Harry Houdini.
Click next on the upper middle bookshelf with the solid green books, click on the "M" volume of the Encyclopedia Libraria of America collection. Open it up and see that is about Marie Antoinette.
Click next on the lower middle bookshelf with the green & white books, click on the "S" volume of the Explorer collection. Open it up and see that is about Lizzie Applegate and the History of San Francisco.
Click next on the upper right bookshelf with the multi-colored books, click on the "B" volume of the Global Book Encyclopedia collection. Open it up and see that is on Braille.
Now lets go on up the stairs and look at the shelving isles up there. Lets start out at the top of the left side of the stair case. Go forward 2 screens and take your next right into the isle.
In the first isle there are no active book shelves on the left, but on the right on the 2nd column 2nd shelf from the bottom, you will see an active shelf. Click the active shelf and you will see an active book on that shelf that has writing in another language.
Now lets go to the next isle. Here you will find an active shelf on the left on the 2nd column, 3rd shelf from the top. Click the active shelf and you will see an active book on that shelf which begins on a Preface about Santa Ana Domingo, thumb through it until the end.
You will find that there are no active shelves on the right side of the isle.
In the next isle you will find an active shelf on 4th column and the 2nd shelf from the top on the left. Click the active shelf and you will see an active book on that shelf that has writing in another language.
In the same isle you will find an active shelf on the right on the 1st column 3rd shelf from the top. Click the active shelf and you will see an active book with an overview of the Crystal Skulls, thumb through it until the end.
7.) SUPER SLEUTH
For snooping in every corner
Click on the Administration IN/OUT board this is one non active part of the game that is needed to achieve this award.
Click on the Gray Enterprises stock news release
Be sure to look in each of the icons on Eloise Drew's computer log-in.
Click on the Student of the month award board for a close up
Make sure you take a look at Connie's Journal when she leaves the room.
Click on the "1967" Sign down in the boiler room.
Click the board in the teachers lounge with the code "CL:D2" on it for an up close view
Click on the cutting board with the tomatoes on it in Maxine's Diner Kitchen it says "WATCH OUT"
Click on the bottom torn corner of the work schedule in Maxine's Diner Kitchen
8.) BURP!
For your love of soft drinks
You will get this award when you purchase and drink each type of soda.
9.) $ GRUBBER
For finding all those shiny quarters
See HIDDEN QUARTER SPOTS
10.) JUKEBOX JIVING
For playing every song
There is no need to wait for them to play all the way through, just pay for and press each individual song.
11.) Q
For following up on every lead
Every time someone says something about someone else, go check up on it, even if it means a lot of footwork.
12.) J'ACCUSE!
For confronting all those weasly suspects
Talk to each character after you see or hear the leads about them.
SCHOOL 2ND TRIP
When you enter the school lets go and try to see if we can get in Jake's Locker. Head toward the gym and look for the locker with the caution tape on it. Take a closer look at the lock, it is a four digit code. Do you remember the clue Hal gave you? He said that Jake wished he had a phone to look at. Lets look at Nancy's Phone. Click on her cell phone and click on "MENU" "PHONE". We are looking for a 4 letter word that JAKE would remember.
How about...JAKE!!! Look at the phone and see that Jake is the numbers: 5253. Click on the combination numbers up or down to put the correct combination in. And Voila! The door opens. There is a magazine, an English Essays book and an empty video case in the top of the locker, look thoroughly at all 3. Then look down to the bottom of the locker and see a newspaper look thoroughly at the article. By reviewing this information you should reach the conclusion of:
1.) Someone won the Paseo Del Mar's 5th annual men's judo tournament but they were masked and unknown identifying himself as "Nineco". This reminds us of clue #11 "A CRANE CONTESTANT IN A MASKED DISGUISE, WON THE PRIZE MONEY DESPITE ALL THE LIES" What did they lie about?
2.) The English Essay book is bookmarked under "A Treatise on Etiquette". Weird...this does not sound like something Jake was interested in or known for...
3.) The video cassette is empty so we must continue to look for it.
4.) The paper is "The Morning Edition" about a break in at a local pharmacy of a drug Hectinol. No one knows who did it... It reminds us of the 5th wall clue: "FIND THE MORNING EDITION AND DISCOVER ANOTHER CRIME, THE ANSWER IS IN BLACK AND WHITE TO WHO WILL DO THE TIME." Wonder who did it?
Let's continue on our search. We know how to set the alarm for the pop machine lets go see if we can get Connie out of the student lounge so we can do some snooping.
Go to the gym soda machine and enter the code we found on clue #13 "GRAPE GRAPE ORANGE COOL WILL PLAY THE ALARM IN THE SCHOOL". When you do Hulk will tell you something cantankerous. Once you have set the alarm off, go to the student lounge and tell Connie that someone set the alarm off.
HINT: You do not want to enter this code in the teacher's lounge or Connie will catch you as the "Pop prankster" the game will be over - although you will have an option for a fatal error 2nd chance.
When you go to Connie, ask her about the empty video cassette case in Jake's locker. Then tell her about the alarm on the soda machine. She leaves, which gives you the opportunity to do some private-eye work.
First of all look at her notebook, you will see that she is writing some sort of love letter. She scribbled out that it is to the student president, so this letter could only be written for Daryl.
Secondly, use the small gold key to open the teacher's lounge. In there we will pan from left to right. Starting from the left you will see a bookshelf with a green marbled bowl on it. On the 3rd shelf is a booklet that is open, pick it up and read it, and you will find out a bit more about Daryl's father and the issue about their business's financial problems.
Next click on the map in the back corner of the room.

You will see a message and clue on it written as follows:
"A TROPHY WAS NOT THE ONLY PRIZE BUT ALSO MONEY OF A GREATER SIZE". Who won a trophy??? Possibly the masked man in the martial arts competition??
Notice that there is a 15th code: Ag:D1
Next you see some filing cabinets, click on the center cabinet drawer and it will open. Look in the cabinet and you will find Hal Tanaka's Student File - Senior Final Paper, open the file and you will see that he plagiarized the book that was found in Jake's locker "Final English Essay". Nancy says "This looks like exactly like the one in Jake's locker." hmmm...why was that book in Jake's locker? Jake must have know about it and was blackmailing Hal. We need to go confront Hal about this.
Continue panning over, you can click on the Administration IN/OUT board, although not required to finish the game.
SPOILER: ALL AWARDS
You can also look at the printer but nothing has been printed yet.
Pan over to the computer, here you can log on using Aunt Eloise's log-in info that you retrieved out of that picture box at the beginning of the game.
Log-In: Eloise Drew
Password: o wise elder
Once logged in, click on the icons.
Start with the printer, you hear the printer running, click OK, and click on "Mail".
It looks like Jake Rogers was on bulletin board duty, which answers who has been leaving the notes...Jake, but why?
There is no CD Rom and nothing in the recycle bin.
Click on passwords, and you will see that the password to the boiler room is "NOTE". (Now all we have to do is decipher it into Braille.)
Click on the Maintenance To Do List: you will see that Dillon HVAC is supposed to do boiler service and that the password to the boiler room should be changed.
Finally, check the To Do List: Here you see that the book English Essays Through the Ages is missing. (Not anymore!)
Lets exit from the computer and look and see what's on the printer.
It looks like Connie Watson's Backpack was found in the student union.
A toolbox from Dillon HVAC Service was left in the boiler room.
A young man was observed peering through the school entrance doorway. It was Hal who needed to get some homework, he was allowed in and escorted out of the building.
2 individuals were arguing outside the Gaiser Gym, it seems to have been Jake and Hulk. (Should probably talk to him about that)
Several students were caught soaping the teacher's lounge windows one of them was Daryl Gray. (Should probably talk to him about that)
Finally screams were heard from the east stairwell and Jake was found.
Panning further to the right you finally come to another bulletin board but this one only has a code on it.

Notice that there is a 16th code: CL:D2
As you exit, you get a threatening phone call. When they hang up look at your phone and the number came up on your caller ID. Call them back and have a non-eventful discussion with them.
Let's go have a visit with everyone again.
Go see Hal Tenaka, talk to him about plagiarizing his senior essay, he explains that Jake blackmailed him, he was under a lot of pressure from his family to get a scholarship and had too much work to keep up on. Jake demanded that Hal do all his homework for the rest of the semester. He assures that even though he was not happy about the situation he would never kill Jake. He values human life! Nancy asks him if he didn't it, who did? Hal mentions Daryl Gray had a meeting with Jake. He didn't know that they were friends. She also asks him why Jake had an empty video case in his locker, he doesn't know anything about it. You also mention to Hall that Connie thinks he studies to hard, he is irritated at her comment but offers no further clues.
Lets go talk to Hulk Sanchez in the gym. You walk up to overhearing a conversation taking place between Hulk and Connie. She is upset that Nancy found out from him that she is having money problems, they have a little spat and she calls him a "loser" he tells her "Don't EVER use that word to refer to me!" She hurts him somehow and the conversation ends. Go in and talk to Hulk. Nancy asks him about the empty video case, he doesn't know anything about it and is tired of talking about him. She then asks him about the robbery at the Drug Station Pharmacy. He doesn't seem to know anything about a robbery either...well, that was helpful.
Lets go talk to Daryl at: MAXINE'S 3RD TRIP
MAXINE'S 2ND TRIP
When you enter Maxine's, go in and talk to Daryl. He tells you about Hal, and that he wants to be a doctor. (Hmmm, that goes along with the 8th clue we looked at - "Student files under lock and key will show the lies of the doctor-to-be". We've got to get in that teacher's lounge!)He doesn't tell you much about Hulk, other than that he is under a lot of pressure to play due to the college scouts. Finally you talk to him about finding Jake's body, he seems very distant and does not want to talk about it.
Now let's go talk to "Uncle Steve". You try to talk to him about how to get into the teacher's lounge and Jake's locker, but he is of no help, seems he just wants you to come to him with "solutions not problems." Guess we will have to put our thinking cap on.
Now lets go back to the: SCHOOL 2ND TRIP
Friday, September 17, 2010
HIGHSCHOOL
You enter the high school, once you get your bearings, you will see that you can go down the hall to the left which takes you to the Gaiser Gym and the Library; or you can go to the right to the Student Union and the Study Dome.
For the sake of clue hints we will go to the left and search out the Eye chart in the gym and see what it says.
On your way to the gym, you see a Student Bulletin Board with a Surf Club poster on it. You will see a message toward the middle of the board. It needs to be deciphered.

This one is deciphered by reading right to left, top to bottom as follows:
"UP, DOWN, LEFT, RIGHT THE FIRST LETTERS WILL HELP MY PLIGHT"
Notice that there is a 4th code: He:u2
We are not sure about that clue yet so lets continue on.
Move down the hallway and notice that there is yellow caution tape on a locker. Take a closer look. It's Padlocked. Can't do anything about that yet so lets continue on.
Move to the end of the hallway and see another Student Bulletin Board with an honor student poster on it. You will see a message on the left side towards the middle.

This clue needs to be deciphered by removing the spaces and separating the words as follows:
"FIND THE MORNING EDITION AND DISCOVER ANOTHER CRIME, THE ANSWER IS IN BLACK AND WHITE TO WHO WILL DO THE TIME."
Notice that there is a 5th code: Ir:D2
We are not sure about that clue yet so lets continue on.
Continuing on,you see another Student Bulletin Board with a women's volleyball poster on it. You will see a message on a pink note on the right side towards the middle.

This clue needs to be deciphered The same way as the Work Schedule at Maxine's Diner as follows:

"SINNERS ON A VID" - hmmm...maybe this video can be played in that TV & VCR at Aunt Eloise's House? Let's keep an eye out for it.
Notice that there is a 6th code: Kr:L2
Continuing on you will pass a hallway that goes to the Library and Study Dome, to the end of the hall where there are 2 double doors. Go to the Student Bulletin Board by the double doors Marked "ATHLETICS" and see 3 notes side by side at the bottom right of the board.

This clue needs to be deciphered in 3 ways. The first note is simply upside down it reads:
"NOWHERE TO TURN TO, NOWHERE TO HIDE, LET THE BOOKS IN THE LIBRARY, BE YOUR ANSWER GUIDE."
The second note is written backwards from right to left bottom to top, as follows:
"A SYMBOL OF KANJI WORN WITH GREAT PRIDE REFLECTS BIG SECRETS THAT SOMEONE MUST HIDE"
The third one is a written upside down and backwards from bottom to top and left to right as follows: "HE DID WHAT IT TOOK TO MAKE THE GRADE, EVEN IF IT WASN'T CHEATING, TO KEEP UP HIS CHARADE."
We are not sure about that clue yet so lets continue on.
Notice that there is a 7th code: K:R1
Move towards the women's restroom of the gym, pan to the left and you see the eye chart from the clue in Maxine's Diner. Let's look at it more closely.
This clue needs to be deciphered by reading it backwards from bottom to top and right to left, as follows:
"IF ANYTHING HAPPENS TO ME LOOK IN MY CHEMISTRY BOOK PAGE THREE ZERO FIVE."
We are going to have to keep an eye open for his chemistry book.
Lets continue to look around. There is a football player in the corner lets go talk to him. Talk to Hector Sanchez "The Hulk". Ask him the series of questions and find out he is the #1 football player in Florida, he plays for the Manatees/Sea Cow (which is the mascot of the school - it looks kinda like a walrus). He explains that someone killed Jake Rogers, apparently he knew him but wasn't friends with him. He may cut you off, but you can talk to him again about Daryl Gray and Jake's locker. He says Daryl found Jake's body...hmmmm. He also tells you to talk to Hal Tanaka, his locker was next to Jake's.
Hey, wasn't he on that Student Bulletin Board as student of the month??? We will have to find him to talk about Jake.
Continue to scan the room and you can see a poster by the soda machine that is out of order, it is an advertisement for the Crane School of Self-Defense. If you decided to call them from your cell phone you will hear that they are not seeking any new initiates at this time. OK...
you can see the red soda machine is working. If you choose you can pay for and drink any soda you wish.
SPOILER: ALL AWARDS
Lets go back to the main entry door and look down the right hallway for other clues.
Going down the right hallway from the main entry, you see a Student Bulletin Board with a "Try out now for varsity soccer!" poster on it, and you will see a message towards the bottom of the board. Read over the message and part of it just doesn't go with the rest.

"Student files under lock and key will show the lies of the doctor-to-be"
Notice that there is a 8th code: HF:L1
We are not sure about that clue yet so lets continue on.
Continue down the hallway.
If you go right you will come to a set of double doors which you cannot enter, but you can approach the door to the left "Maintenance Room". If you look at the lock you see that the code pad is in braille.
We cannot enter this door yet, as we need to find the clue to get in so keep an eye out and lets continue on.
Head down the hallway toward the Student Union and Study Dome. You see a Student Bulletin Board on the right with a "Student Art Exhibit" poster on it, and you will see a message towards the center of the board. Read over the message you will see that certain letters are underlined.

This clue needs to be deciphered by combining all underlined letters in order from top to bottom, left to right as follows:
"PUT ELEMENTS IN ORDER TO OPEN PUZZLE"
Notice that there is a 9th code: Zn:D1
We are not sure about that clue yet so lets continue on.
Going down the hallway, you will see an arch that opens up to the teachers lounge with another soda machine in it. Enter this area and and lets look around. You will see another Student Bulletin Board titled "STUDENT NEWS". On the bottom of the board towards the left is a pink note.
This clue needs to be deciphered by taking the first letter of each line, top to bottom and combining it in to a phrase as follows:

"FIFTH MAP DRAWER"
Notice that there is a 10th code: La:U2
We are not sure about that clue yet so lets continue on.
You can try to enter the door of the Teacher's Lounge but it is locked. Connie says: "You're not supposed to go in there..." Nancy says: "But I have a key" Connie says: "Yeah right, I've heard that one before."
(That's right! That key that you got out of that cut out book at Aunt Eloise's House")
Well we are not going to be able to enter that door while Connie is there, so we may as well move on...Speaking of, that is "CONNIE" the girl Daryl was talking about, let's go have a visit.
Speak with Connie Watson - the hall monitor, and ask her all the questions available. She tells you what happened with Jake Rogers. She tells you that he was a total creep and no one liked him. She may cut off the conversation but you can talk to her again. You ask her if she knows about the weird messages on the bulletin boards, she talks to you about the soda machine alarm. She talks to you about Daryl Gray, seems she is crushing on him a bit, it is weird that he drives an expensive sports car yet works at a diner. She gets irritated about so many questions but, no worries, she gets over it. She also mentions that she doesn't know Hulk Sanchez very well.
Go back out to the hallway and turn left. You will see yet another Student Bulletin board on the wall prior to entering the study hall that has a "Get Involved sticker on it". If you look on the note right under that poster you will see another clue.

This clue needs to be deciphered. The words are split in half horizontally, simply piece them back together and read them as they are written as follows:
"A CRANE CONTESTANT IN A MASKED DISGUISE, WON THE PRIZE MONEY DESPITE ALL THE LIES"
A crane contestant reminds us of that poster that was in the gym for the Crane School of Self-Defense...hmmm we'll need to keep our eyes out for more on that.
Notice that there is an 11th code: AS:U4
Go into the Study Hall, here we see another Student Bulletin Board with a "JUST SAY NO" sign on it. If you look at the center of the board to the left on a small paper, there is another clue which doesn't look quite like the rest of the note.

This clue needs to be deciphered by reading right to left top to bottom as follows:
"THE HIDDEN VIDEO TAPE WILL SEAL MY MURDERERS FATE"
Again with the video tape...this will definitely be a strong piece of evidence in this case when we find it.
Notice that there is a 12th code: C:R1
Let's move on. Pan to the right and you will see a student doing schoolwork at the table. Lets go have a chat. This is Hal Tanaka, an exchange student from Japan. Ask him all the questions prompted. He explains that Jake Rogers tried to take the easy way out and got killed over it. He may cut out short in the conversation but you can talk to him again. He gives you info that Hulk Sanchez got an injury - we will have to go talk to him about that. He tells you about Connie Watson he tells you that Connie was dating Jake Rogers - we will have to go talk to her about that. He informs you that Daryl Gray's father went bankrupt, (thus the reason for his sports car and working at a diner) - We'll have to go talk to him about that. You also ask him about the combination for the lock on Jake's locker, he tells you, "I remember one day Jake was mad because he couldn't open his locker. He told me he wished he had a phone handy."
Let's go down the final hallway that intersects to get to the library. When you get to the library entrance look around until you see another Student Bulletin Board with a "PHOTOGRAPHY & VIDEO CLUB" Poster on it. At the bottom left of the board you see a note.

This clue needs to be deciphered by reading right to left top to bottom as follows:
"GRAPE GRAPE ORANGE COOL WILL PLAY THE ALARM IN THE SCHOOL"
Those were the flavors on the soda machine. (HEY! Maybe that is a way we can get Connie out of the student lounge so we can get into the locked teachers lounge room!)
Notice that there is a 13th code: Zr:R4
Pan over to the other side of the library doors and you will see another Student Bulletin Board, with a poster of a pharaoh on it. Directly under that poster is a note:

it has the numbers 3.15.15.12, 3.15.15.12, 16.15.16, 19.16.15.20 7.18.1.16.5
The way it is set up with commas, helps us know that these are words. The numbers coincide with the order of the letters in the alphabet. Solution as follows:
3 - C
15 - O
15 - O
12 - L
3 - C
15 - O
15 - O
12 - L
16 - P
15 - O
16 - P
19 -S
16 - P
15 - O
20 - T
7 - G
18 - R
1 - A
16 - P
5 - E
"COOL, COOL, POP, SPOT, GRAPE"
Notice that there is a 14th code: Y:D3
Before we go in the library, lets go talk with the kids one more time. Since we are heading to the gym, lets go chat with "Hulk". You ask if he knows Hal Tanaka. He informs you that he has quite a temper and a friend of Jake's, well at least they hung out, even more disconcerting was the last time he saw Hal and Jake together, Hall seemed pretty upset. You also ask him about Connie, apparently she is at the gym a lot and having some money problems. You also talk to him about his injury but he plays it off.
Now lets go talk to Connie. You talk to her about dating Jake, she says it was a mistake. You also mention Hulk's statement about her money problems, which she gets quite irritated about but gives you no solid info. Asking her about Hal Tanaka doesn't give you much other than he is a total burned out workaholic.
SPOILER: HIDDEN QUARTER SPOTS
Finally lets go back to Maxine's and talk to Daryl and update "Uncle Steve".
Exit the school and go to: MAXINE'S 2ND TRIP
For the sake of clue hints we will go to the left and search out the Eye chart in the gym and see what it says.
On your way to the gym, you see a Student Bulletin Board with a Surf Club poster on it. You will see a message toward the middle of the board. It needs to be deciphered.

This one is deciphered by reading right to left, top to bottom as follows:
"UP, DOWN, LEFT, RIGHT THE FIRST LETTERS WILL HELP MY PLIGHT"
Notice that there is a 4th code: He:u2
We are not sure about that clue yet so lets continue on.
Move down the hallway and notice that there is yellow caution tape on a locker. Take a closer look. It's Padlocked. Can't do anything about that yet so lets continue on.
Move to the end of the hallway and see another Student Bulletin Board with an honor student poster on it. You will see a message on the left side towards the middle.

This clue needs to be deciphered by removing the spaces and separating the words as follows:
"FIND THE MORNING EDITION AND DISCOVER ANOTHER CRIME, THE ANSWER IS IN BLACK AND WHITE TO WHO WILL DO THE TIME."
Notice that there is a 5th code: Ir:D2
We are not sure about that clue yet so lets continue on.
Continuing on,you see another Student Bulletin Board with a women's volleyball poster on it. You will see a message on a pink note on the right side towards the middle.

This clue needs to be deciphered The same way as the Work Schedule at Maxine's Diner as follows:

"SINNERS ON A VID" - hmmm...maybe this video can be played in that TV & VCR at Aunt Eloise's House? Let's keep an eye out for it.
Notice that there is a 6th code: Kr:L2
Continuing on you will pass a hallway that goes to the Library and Study Dome, to the end of the hall where there are 2 double doors. Go to the Student Bulletin Board by the double doors Marked "ATHLETICS" and see 3 notes side by side at the bottom right of the board.

This clue needs to be deciphered in 3 ways. The first note is simply upside down it reads:
"NOWHERE TO TURN TO, NOWHERE TO HIDE, LET THE BOOKS IN THE LIBRARY, BE YOUR ANSWER GUIDE."
The second note is written backwards from right to left bottom to top, as follows:
"A SYMBOL OF KANJI WORN WITH GREAT PRIDE REFLECTS BIG SECRETS THAT SOMEONE MUST HIDE"
The third one is a written upside down and backwards from bottom to top and left to right as follows: "HE DID WHAT IT TOOK TO MAKE THE GRADE, EVEN IF IT WASN'T CHEATING, TO KEEP UP HIS CHARADE."
We are not sure about that clue yet so lets continue on.
Notice that there is a 7th code: K:R1
Move towards the women's restroom of the gym, pan to the left and you see the eye chart from the clue in Maxine's Diner. Let's look at it more closely.
This clue needs to be deciphered by reading it backwards from bottom to top and right to left, as follows:
"IF ANYTHING HAPPENS TO ME LOOK IN MY CHEMISTRY BOOK PAGE THREE ZERO FIVE."
We are going to have to keep an eye open for his chemistry book.
Lets continue to look around. There is a football player in the corner lets go talk to him. Talk to Hector Sanchez "The Hulk". Ask him the series of questions and find out he is the #1 football player in Florida, he plays for the Manatees/Sea Cow (which is the mascot of the school - it looks kinda like a walrus). He explains that someone killed Jake Rogers, apparently he knew him but wasn't friends with him. He may cut you off, but you can talk to him again about Daryl Gray and Jake's locker. He says Daryl found Jake's body...hmmmm. He also tells you to talk to Hal Tanaka, his locker was next to Jake's.
Hey, wasn't he on that Student Bulletin Board as student of the month??? We will have to find him to talk about Jake.
Continue to scan the room and you can see a poster by the soda machine that is out of order, it is an advertisement for the Crane School of Self-Defense. If you decided to call them from your cell phone you will hear that they are not seeking any new initiates at this time. OK...
you can see the red soda machine is working. If you choose you can pay for and drink any soda you wish.
SPOILER: ALL AWARDS
Lets go back to the main entry door and look down the right hallway for other clues.
Going down the right hallway from the main entry, you see a Student Bulletin Board with a "Try out now for varsity soccer!" poster on it, and you will see a message towards the bottom of the board. Read over the message and part of it just doesn't go with the rest.

"Student files under lock and key will show the lies of the doctor-to-be"
Notice that there is a 8th code: HF:L1
We are not sure about that clue yet so lets continue on.
Continue down the hallway.
If you go right you will come to a set of double doors which you cannot enter, but you can approach the door to the left "Maintenance Room". If you look at the lock you see that the code pad is in braille.
We cannot enter this door yet, as we need to find the clue to get in so keep an eye out and lets continue on.
Head down the hallway toward the Student Union and Study Dome. You see a Student Bulletin Board on the right with a "Student Art Exhibit" poster on it, and you will see a message towards the center of the board. Read over the message you will see that certain letters are underlined.

This clue needs to be deciphered by combining all underlined letters in order from top to bottom, left to right as follows:
"PUT ELEMENTS IN ORDER TO OPEN PUZZLE"
Notice that there is a 9th code: Zn:D1
We are not sure about that clue yet so lets continue on.
Going down the hallway, you will see an arch that opens up to the teachers lounge with another soda machine in it. Enter this area and and lets look around. You will see another Student Bulletin Board titled "STUDENT NEWS". On the bottom of the board towards the left is a pink note.
This clue needs to be deciphered by taking the first letter of each line, top to bottom and combining it in to a phrase as follows:

"FIFTH MAP DRAWER"
Notice that there is a 10th code: La:U2
We are not sure about that clue yet so lets continue on.
You can try to enter the door of the Teacher's Lounge but it is locked. Connie says: "You're not supposed to go in there..." Nancy says: "But I have a key" Connie says: "Yeah right, I've heard that one before."
(That's right! That key that you got out of that cut out book at Aunt Eloise's House")
Well we are not going to be able to enter that door while Connie is there, so we may as well move on...Speaking of, that is "CONNIE" the girl Daryl was talking about, let's go have a visit.
Speak with Connie Watson - the hall monitor, and ask her all the questions available. She tells you what happened with Jake Rogers. She tells you that he was a total creep and no one liked him. She may cut off the conversation but you can talk to her again. You ask her if she knows about the weird messages on the bulletin boards, she talks to you about the soda machine alarm. She talks to you about Daryl Gray, seems she is crushing on him a bit, it is weird that he drives an expensive sports car yet works at a diner. She gets irritated about so many questions but, no worries, she gets over it. She also mentions that she doesn't know Hulk Sanchez very well.
Go back out to the hallway and turn left. You will see yet another Student Bulletin board on the wall prior to entering the study hall that has a "Get Involved sticker on it". If you look on the note right under that poster you will see another clue.

This clue needs to be deciphered. The words are split in half horizontally, simply piece them back together and read them as they are written as follows:
"A CRANE CONTESTANT IN A MASKED DISGUISE, WON THE PRIZE MONEY DESPITE ALL THE LIES"
A crane contestant reminds us of that poster that was in the gym for the Crane School of Self-Defense...hmmm we'll need to keep our eyes out for more on that.
Notice that there is an 11th code: AS:U4
Go into the Study Hall, here we see another Student Bulletin Board with a "JUST SAY NO" sign on it. If you look at the center of the board to the left on a small paper, there is another clue which doesn't look quite like the rest of the note.

This clue needs to be deciphered by reading right to left top to bottom as follows:
"THE HIDDEN VIDEO TAPE WILL SEAL MY MURDERERS FATE"
Again with the video tape...this will definitely be a strong piece of evidence in this case when we find it.
Notice that there is a 12th code: C:R1
Let's move on. Pan to the right and you will see a student doing schoolwork at the table. Lets go have a chat. This is Hal Tanaka, an exchange student from Japan. Ask him all the questions prompted. He explains that Jake Rogers tried to take the easy way out and got killed over it. He may cut out short in the conversation but you can talk to him again. He gives you info that Hulk Sanchez got an injury - we will have to go talk to him about that. He tells you about Connie Watson he tells you that Connie was dating Jake Rogers - we will have to go talk to her about that. He informs you that Daryl Gray's father went bankrupt, (thus the reason for his sports car and working at a diner) - We'll have to go talk to him about that. You also ask him about the combination for the lock on Jake's locker, he tells you, "I remember one day Jake was mad because he couldn't open his locker. He told me he wished he had a phone handy."
Let's go down the final hallway that intersects to get to the library. When you get to the library entrance look around until you see another Student Bulletin Board with a "PHOTOGRAPHY & VIDEO CLUB" Poster on it. At the bottom left of the board you see a note.

This clue needs to be deciphered by reading right to left top to bottom as follows:
"GRAPE GRAPE ORANGE COOL WILL PLAY THE ALARM IN THE SCHOOL"
Those were the flavors on the soda machine. (HEY! Maybe that is a way we can get Connie out of the student lounge so we can get into the locked teachers lounge room!)
Notice that there is a 13th code: Zr:R4
Pan over to the other side of the library doors and you will see another Student Bulletin Board, with a poster of a pharaoh on it. Directly under that poster is a note:

it has the numbers 3.15.15.12, 3.15.15.12, 16.15.16, 19.16.15.20 7.18.1.16.5
The way it is set up with commas, helps us know that these are words. The numbers coincide with the order of the letters in the alphabet. Solution as follows:
3 - C
15 - O
15 - O
12 - L
3 - C
15 - O
15 - O
12 - L
16 - P
15 - O
16 - P
19 -S
16 - P
15 - O
20 - T
7 - G
18 - R
1 - A
16 - P
5 - E
"COOL, COOL, POP, SPOT, GRAPE"
SPOILER: ALL AWARDS
Notice that there is a 14th code: Y:D3
Before we go in the library, lets go talk with the kids one more time. Since we are heading to the gym, lets go chat with "Hulk". You ask if he knows Hal Tanaka. He informs you that he has quite a temper and a friend of Jake's, well at least they hung out, even more disconcerting was the last time he saw Hal and Jake together, Hall seemed pretty upset. You also ask him about Connie, apparently she is at the gym a lot and having some money problems. You also talk to him about his injury but he plays it off.
Now lets go talk to Connie. You talk to her about dating Jake, she says it was a mistake. You also mention Hulk's statement about her money problems, which she gets quite irritated about but gives you no solid info. Asking her about Hal Tanaka doesn't give you much other than he is a total burned out workaholic.
SPOILER: HIDDEN QUARTER SPOTS
Finally lets go back to Maxine's and talk to Daryl and update "Uncle Steve".
Exit the school and go to: MAXINE'S 2ND TRIP
MAXINE'S DINER
Enter Maxine's Diner and go left to visit with Detective Beech/Uncle Steve. Nancy asks for a debriefing on the investigation. He tells you about Jake Rogers, a senior at Paseo del Mar High School. He states that they don't have any information that gives them any leads. They found nothing in his locker or cell phone, but his bank records show differently they suspect something shady, perhaps, drugs, gambling or blackmail???? It's your job to talk to the students. He thinks that Jake may have kept a notebook or journal, so keep a look out for that.
Next lets go talk to the Daryl Gray at the diner counter.
SPOILER: ALL AWARDS
Ask him the questions prompted. He tells you a little about the situation but nothing real worthwhile.
Next open one of the menu's on the wall by the door (there is also one on the table by the jukebox).

Certain letters on the menu are different colors if you put them together you will come up with:

Notice that there is a code: Xe:R3
You can also see that there is a jukebox where you can play each "song" if you so desire.
SPOILER: ALL AWARDS
You can also go to the Barnacle Blast Video game and play - it costs a quarter to play FYI.
SPOILER: ALL AWARDS
Finally, lets go to the kitchen (double doors at the end of the counter by the display case) and do some super sluthing. When you enter the double doors, turn to your left and look in the black dish pan by the "Safety First" poster. Click on the soup ladle and it will go into your inventory. Notice the wadded up paper by the dish pan. Click on it and see that it is a note to Daryl from someone named Connie. She broke off their date to the Sadie Hawkin's dance. hmmmm. We'll have to ask him about that. But who is Connie?
Go over to the cutting board with the tomatoes on it, notice the carved warning "WATCH OUT".
When you look under the table you will see a pipe, you can click it to get a closer look. You see a pair of bolt cutters holding up the pipe. You can remove the wire cutters but if you do the pipe falls and creates a gas leak. You must quickly find something to replace the wire cutters. Look in your inventory, what can you use? Aha! The soup ladle. Quickly switch them out, or the game will be over - although you will have an option for a fatal error 2nd chance.
Pan across the rest of the kitchen and you will see a work schedule posted on the side of the counter. A piece of the schedule is ripped off. Click on the tack and Nancy says: "Hmmm...looks like something was removed here." Look on the bottom of the schedule you see the following:


Notice that there is a 2nd code: Te:L3
Now look on the fridge door and see that there is another note on Closing Proceedure:

On the bottom of the page you see a series of numbers. If you look at the how many lines there are on the paper there are 14 lines. So if you take the code:
1.3, 8.9, 6.7, 4.4, 5.4, 4.4, 12.5, 4.9, 8.5, 13.6, 4.6, 10.8, 14.5, 4.10
Solution as follows:
1.3 = First line, Third word: Daryl
8.9 = Eighth line, Ninth word: Brings
6.7 = Sixth line, Seventh word: Secrets
4.4 = Fourth line, Fourth word: To
5.4 = Fifth line, Fourth word: Diner
4.4 = Fourth line, Fourth word: To
12.5 = Twelfth line, Fifth word: Get
4.9 = Fourth line, Ninth word: The
8.5 = Eighth line, Fifth word: Cash
13.6 = Thirteenth line, Sixth word: For
4.6 = Fourth line, Sixth word: A
10.8 = Tenth line, Eighth word: Life
14.5 = Fourteenth line, Fifth word: So
4.10 = Fourth line, Tenth word: Finer
DARYL BRINGS SECRETS TO DINER TO GET THE CASH FOR A LIFE SO FINER
Notice that there is a 3rd code: Hg:L3
Go back to Daryl and ask him why Connie broke up their date. He really doesnt know but it is interesting that she took Jake instead of him, and now Jakes dead?!?!? We need to find this, Connie, and ask her some questions.
SPOILER: HIDDEN QUARTER SPOTS
So lets go off to the HIGHSCHOOL
Next lets go talk to the Daryl Gray at the diner counter.
SPOILER: ALL AWARDS
Ask him the questions prompted. He tells you a little about the situation but nothing real worthwhile.
Next open one of the menu's on the wall by the door (there is also one on the table by the jukebox).

Certain letters on the menu are different colors if you put them together you will come up with:

Notice that there is a code: Xe:R3
You can also see that there is a jukebox where you can play each "song" if you so desire.
SPOILER: ALL AWARDS
You can also go to the Barnacle Blast Video game and play - it costs a quarter to play FYI.
SPOILER: ALL AWARDS
Finally, lets go to the kitchen (double doors at the end of the counter by the display case) and do some super sluthing. When you enter the double doors, turn to your left and look in the black dish pan by the "Safety First" poster. Click on the soup ladle and it will go into your inventory. Notice the wadded up paper by the dish pan. Click on it and see that it is a note to Daryl from someone named Connie. She broke off their date to the Sadie Hawkin's dance. hmmmm. We'll have to ask him about that. But who is Connie?
Go over to the cutting board with the tomatoes on it, notice the carved warning "WATCH OUT".
When you look under the table you will see a pipe, you can click it to get a closer look. You see a pair of bolt cutters holding up the pipe. You can remove the wire cutters but if you do the pipe falls and creates a gas leak. You must quickly find something to replace the wire cutters. Look in your inventory, what can you use? Aha! The soup ladle. Quickly switch them out, or the game will be over - although you will have an option for a fatal error 2nd chance.
Pan across the rest of the kitchen and you will see a work schedule posted on the side of the counter. A piece of the schedule is ripped off. Click on the tack and Nancy says: "Hmmm...looks like something was removed here." Look on the bottom of the schedule you see the following:


Notice that there is a 2nd code: Te:L3
Now look on the fridge door and see that there is another note on Closing Proceedure:
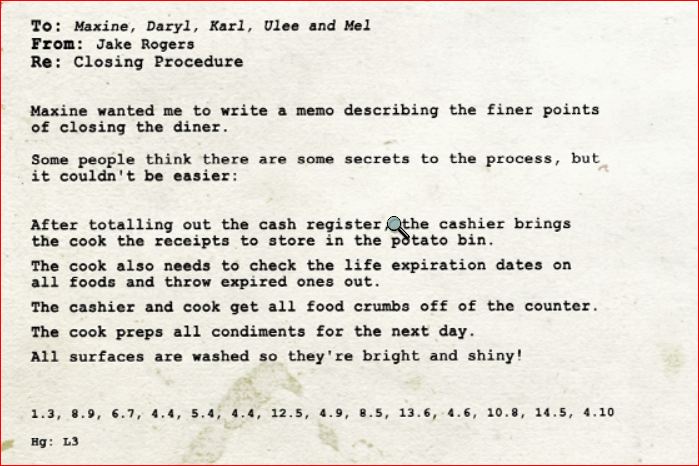
On the bottom of the page you see a series of numbers. If you look at the how many lines there are on the paper there are 14 lines. So if you take the code:
1.3, 8.9, 6.7, 4.4, 5.4, 4.4, 12.5, 4.9, 8.5, 13.6, 4.6, 10.8, 14.5, 4.10
Solution as follows:
1.3 = First line, Third word: Daryl
8.9 = Eighth line, Ninth word: Brings
6.7 = Sixth line, Seventh word: Secrets
4.4 = Fourth line, Fourth word: To
5.4 = Fifth line, Fourth word: Diner
4.4 = Fourth line, Fourth word: To
12.5 = Twelfth line, Fifth word: Get
4.9 = Fourth line, Ninth word: The
8.5 = Eighth line, Fifth word: Cash
13.6 = Thirteenth line, Sixth word: For
4.6 = Fourth line, Sixth word: A
10.8 = Tenth line, Eighth word: Life
14.5 = Fourteenth line, Fifth word: So
4.10 = Fourth line, Tenth word: Finer
DARYL BRINGS SECRETS TO DINER TO GET THE CASH FOR A LIFE SO FINER
Notice that there is a 3rd code: Hg:L3
Go back to Daryl and ask him why Connie broke up their date. He really doesnt know but it is interesting that she took Jake instead of him, and now Jakes dead?!?!? We need to find this, Connie, and ask her some questions.
SPOILER: HIDDEN QUARTER SPOTS
So lets go off to the HIGHSCHOOL
HIDDEN QUARTER SPOTS
Hidden Spots – Quarters (Total of 123)
1.) Coffee cup at Nancy’s desk prior to clicking on the plane ticket
House
2.) On the top light fixture to the left of the door
3.) In the drawer where the calculator is at the left & back of the calculator
4.) In the drawer where the reminder notes are at the back of the stationary
5.) Entertainment center to the left in open spot where book should be
6.) In wooden chest – one in each white roll (total of 2)
7.) “”
Maxine’s Diner
8.) On the round table to the left where the black old car is on the picture is a quarter on the mustard lid.
9.) When coming out of the kitchen look to the left between the 2 glass cake displays on the counter it is between the 2 displays on the counter.
10.) Look up to the ceiling fan and there is another quarter on the fan blade facing you.
11.) When you get done talking to Detective Beech/Uncle Steve there is a quarter on the floor behind the chair closest to you
School
Entry
12.) In the g of “regrets” in the DaVinci quote of the wall to the right of the American flag
Maintenance Room
13.) In the corner to the right of the exit doors by the maintenance room.
14.) Once the maintenance room is unlocked, enter, directly to the left of the elevator on the steel barrel is a quarter.
15.) In the boiler room there is an orange cone to your left on the tip of the single cone is a quarter.
Student Lounge
16.) In the Manatee/Walrus Teeth in the teacher’s lounge with the soda machine
17.) On the left part of the plant pot next to the left of the teachers lounge door.
18.) After Cindy the Hall Monitor leaves there is a quarter on her “PHIZZ” drink
19.) The top of the door post to the Student Files Room in the teachers lounge
20.) On the magazine shelf total of 3 magazines – 3rd magazine from right on bottom shelf to the right of the panda magazine, the next magazine over to the left of the panda magazine, and 2 magazines more to the left with the girl with her hand on her face on the front “Kim” (total of 3)
21.) “”
22.) “”
23.) Next to the phone book to the left of the soda machine
24.) To the left of the exit of the Student Lounge on the floor in the corner
Student Files Room
25.)On the bookshelf in the green marbled bowl
26.)On the purple physics level 1 book
27.)On the book shelf on the pumpkin
28.)In the doughnuts in the middle of the table
29.)In the lower blue paper file holder to the left of the computer
30.)In the pencil holder to the right of the computer
Study Hall
31.) In the wadded up paper in the center of the 2nd table to the left in the Study Hall where Hal Tanaka is
32.) On top of the fire extinguisher box in Study Hall
33.) On the hole of the garbage can
Library
34.) In the hallway on the far left art exhibit there is a black & white Nancy Drew drawing it is on her magnifying glass
35.) In the hallway on the candle tip on the 3 from the left student art exhibit.
36.) In the library in the center isle going toward the stairs on the last set of tables to the left is a purple book laying on a yellow book. The Quarter is in the space between the 2 books.
37.) In the library 1st floor to the left, and under the book cart between the 2 isles.
38.) When you are on the first floor next to the book isles, turn into the first isle after the book cart and look on the empty spot on the left side, 2nd column, 3rd row from the top
39.) In the 2nd level of the library, on the right side there are desk booths and the quarter is sitting on a blue book
40.) On the 2nd level of the library on the left side there is a book cart in the back, it is under it (looking at it from where are portraits are)
41.) On the 2nd level of the library in the book isle you can enter closest to the back on the floor next to the right shelf after you enter the shelving area.
Gym
42.) On the tennis racket in the Gym where the concession window is
In Jake's Locker
43.) Zoom in on the newspaper by “2:00 a.m.” and you will see a glimmer
SPOILER: ALL AWARDS
44-123.) Bonus: If you get the code for one of the clues to the pop machine you will get an Easter egg as well as a bonus 80 quarters!!! Solution below:
Enter the #14 puzzle code into the pop machine and see what happens "COOL, COOL, POP, SPOT, GRAPE"
When you enter this combination - Cool, Cool, Extra Pop, Spot Cola, Grape; a Easter egg comes out and you will also be awarded 80 quarters.
AUNT ELOISE'S HOUSE
You start out at Aunt Eloise's House looking at the credenza in the entry of the house. There is an obvious letter on the credenza click on it to read it.
She explains that he had to close the School Library early today, but if you need to do any research for your case the key to the library is in the safe. Remember not to enter in a wrong combination!!!
The right hand drawer can be opened and you see an invitation from the Sigma Phi Kappa Delta Sorority. Notice the symbol on the top of the page.

Go down the hallway to the tapestry, click on the tapestry and behind it a safe will appear. Click on the safe and enter the code from the invitation. HINT: If you pick the wrong combo 3 times you will get trapped and the game will be over - although you will have an option for a fatal error 2nd chance.
Once the safe is open you will see a small key hanging on one of the hooks on the door. Take the "IDEAS" key (to open the library in the school) and it will automatically go into your inventory.
Then click on the puzzle box to open it.

This is your standard slide puzzle, it does take some time to get all the pieces in the right place. I have numbered the blocks to the place they should be. If you should need more help in solving this puzzle, leave a comment below and I will answer promptly.


Once you finish the puzzle the little drawer in the front will open and a little piece of paper has Eloise's School computer log on:
Log-in Name: Eloise DREW
Password: O WISE ELDER
(This information will save in your journal notes for future reference)
Go in to the living room and go to the stack of books on the small table, open and read the book "Hidden Clues are Everywhere" you can read the portion about the haunted ghost bridge - but the clue is in the Title, it gives you an idea what to look for to get started - hidden clues.
Next look in in the lamp stand drawer, in it you find reminders written by Eloise:
Talk to Jake about library books out of order
Call Nancy to get flight number
Call Jackie about Spanish Schools.
It is easy to draw from this clue that something should be looked for in the library books.
Next look in the entertainment center you will see on the book shelf to the left that there is a book with some conversation...not an important part of the game.
To the right is another bookshelf, there is a book on the shelf that has a key for the Teacher's Lounge in it. Pick up and place the key in your inventory.
You can also open the center console and find a TV and VCR. You can turn on the TV but nothing plays. Click on the VCR and Nancy will say: "I need something to make this work." So we need to look for some sort of VHS tape.
We have looked at all the clues, if you wish to find all of the hidden Quarters you can go to the SPOILER: HIDDEN QUARTER SPOTS link for all locations.
We have now looked thoroughly through the house, so lets go see what is outside.
Head to the door and before you exit, Detective Beech aka "Uncle Steve" will call you and tell you that if you have any questions you can meet him at Maxine's Diner.
That's a good place to go next: Click here to go to MAXINE'S DINER.
GETTING STARTED
Hello all, this is my 2nd walkthrough, I decided to do this because frankly I have tried to get thorough walkthroughs before and find them somewhat left to be desired. So, here goes. Let me know what you think…
First of all for those of you who are Nancy Drew fans and know how it all works, I have added specific SPOILERS to separate links throughout. For example: For all of you who want to find all of the AWARDS for the end of the game you can go to this link and it will take you step by step to the awards screen.
Getting Started:
The game will open up with the initial screen that is Nancy’s Desk, on the desk is a case file, a book “How to be a Detective”, a scrap book detailing many of Nancy’s other adventures, and a plane ticket. You can click on all but the plane ticket to get more information about the game, past adventures and the current case Nancy will be working on. Once you have reviewed everything, you will need to click on the plane ticket to start your adventure.
SPOILER: HIDDEN QUARTER SPOTS
Once you click on the plane ticket you will be given 2 choices.
1.) Junior Detective
2.) Senior Detective
For the sake of clarity I will be doing the walkthrough based on the Senior Detective adventure which has the “hints” disabled.
A few pointers, when the game begins Nancy will be reading a letter that she is writing to her Dad which will review your case. Once Nancy finishes reading the letter you will need to click on it to send it off. You then are placed in your Aunt Eloise's house in Florida. You will have a few things in your possession, which appear on the bottom left of the screen. You have your bag of inventory where you can open and use, read, or select the items seen. If it has an eye, you can look at it closer – for example read a letter. You can also select something in your inventory by clicking it and clicking on something to use it on – for example a key to open a locked drawer, you would click on the key in your bag and then click on the lock on the drawer and it will automatically unlock. Next to the bag you have your journal, which has phone numbers, observations, and clues. These can come in helpful if you get caught in what seems to be a dead end. Next is your Task List, which when you are a Senior Detective, is disabled. Finally you have your cell phone/camera. This can come in very useful at times.
To operate your cell phone you click on it, then click on “menu”. You have 3 options from there - phone, camera, settings. Phone will take you to your cell phone, where you can make a phone call to your boyfriend Ned Nickerson. To make a call to a contact, click the left or right arrow on each side of the empty box and your contacts will appear, move to the contact you wish to call and click the “call” button.
Camera will take you into picture mode. There is no game requirements for picture taking in this particular game.
On the bottom right of the screen features: game settings, load a game, save a game, and quit the game. Pretty self-explanatory right? I guess if you need help with these, post a comment, and I would be glad to help. :)
HINT: Save regularly on many different slots, that way if you miss something and have to go back you will be able to start from a previous save rather than overwriting the last data and only have 1 saving point.
One last thing: When you are looking around, your magnifying glass will light up red when you can take a closer look, when you can use or take something it turns into a hand, when it turns into an arrow you can switch camera angles.
Ready to get started?
Let's move on to: AUNT ELOISE'S HOUSE
Welcome to my Blog!
Hello, I am Toad Hopper, an AVID Nancy Drew fan. This is my 2nd walkthrough, because I have played and beaten every Nancy Drew Game out there so far and I know that sometimes it really sucks to get stuck and not know what to do. I know that thorough walkthroughs are limited and you have to search so many different sites to get the information you need. I also know that it would be super convenient to have a thorough walkthrough just on one site. So I decided to do my 2nd walkthrough due to the response to my last blog, Trail of the Twister by the general public. I took a lot of time and have put this walkthrough together to the best of my knowledge and actually had a lot of fun doing it. I am also fairly new to blogging. So I hope that I can set this up so it is easily accessible as well as organized. I would appreciate any feedback good or bad and I will do my best to make any changes. I also encourage you to let me know if I am missing anything, or if you know of any other cheats/hints that need to be inputted. If this walkthrough is a success, I may post walkthroughs of other needed Nancy Drew games at your request. Thank you for your feedback, hope this helps.
THIS BLOG IS THE THOROUGH WALKTHROUGH FOR NANCY DREW: Secrets Can Kill: REMASTERED
Lets move on to: GETTING STARTED
THIS BLOG IS THE THOROUGH WALKTHROUGH FOR NANCY DREW: Secrets Can Kill: REMASTERED
Lets move on to: GETTING STARTED
Subscribe to:
Posts (Atom)